Welcome to the official game development portion of the course! While the previous lesson simply involved putting up a skeleton of the menu system, it's now time to get serious about game development.
At the end of this lesson, you will be given the .zip file for the "Break It!" game, and the lesson's contents from there on will document the code for the game in brief. Comments in the game's code, and searching through Python 3's documentation, should help with the rest.
Be warned, though, that often a Google search for a specific part of Python documentation will lead you to Python 2.7 documentation instead; if you find yourself on such a page, just go to the top left corner, where there'll be a drop-down saying (for example) "2.7.13". You want to click on that drop-down and select at least Python 3.6, which should be the second-highest item on the list, near the top.
Before we enter the game development portion, let's briefly cover part of the Python library you've been missing: File Input and Output.
File I/O
Up until now, we've simply written everything we need inside of our Python code, and everything else could be handled with user input. However, this can be a pain if you need to change anything in your game, when that thing isn't actual code. Say you need to read in a file containing a level description, or you want to load an image; how do you do either of these things? You use File I/O.
The file and path management system in Python is pretty straight-forward, fortunately for us. The first part of this is the open() built-in function. Say we want to open a level file to read it, and that file is contained in our level directory. Assuming our main Python file is simply in our main directory, we could type:
level = open("level/L1.dat", "r")
This opens the file in "read mode", as indicated by the second argument. "level" has now become a file object, which has methods we can use to read out from the file.
If we want to open a file to write to, such as a save file for instance, we can instead pass "w" to that argument:
savefile = open("save/S1.dat", "w")
Note that writing to a file like this will make a new file. If a file with that name already exists, Python will "clobber" the file, destroying the existing file if there is one. If this is not what you want to do, but you instead want to write to the end of the file (for instance, for error logs), you would instead open in append mode, using "a".
All three of these modes are text modes, and the I/O methods used will give and take strings. There are binary modes available (explained in the online documentation) but their use will not be covered here.
For more information on opening files (and other parts of file I/O for that matter), see https://docs.python.org/3/tutorial/inputoutput.html#reading-and-writing-files.
Reading from and Writing to Files
There are two methods you'll likely use for reading from a file, .read() and .readline(). .readline() reads a single line from the file, and returns that string.
line = level.readline()
You will likely want to read lines from a file in this fashion, running in a loop until the string returned is just "". An empty string means the end of file (EOF) has been reached; an empty line will instead be the string "\n", containing the newline character. Also note, each line will end with the newline character; it is not trimmed out of the string, ever.
Repeatedly calling .readline() will read the lines from the file in sequence. The "seek" position of the file will be set to the beginning of the next line each time, or remain at EOF if the last line has been read.
The other way to read from a file is to use .read(). This method takes an optional argument for the size, in characters, of the string you want to read from the file. It then reads that many characters from the "seek" position, returns the string, and moves the "seek" position to just after that data in the file. As with .readline(), when EOF has been reached, calls to .read() will always return the empty string "".
header = level.read(64) # gets 64 characters
data = level.read() # gets the entire rest of the file
If you don't give .read() an argument, it will instead read the entire file from the "seek" position to EOF.
You can write to a file with the .write() method. This simply writes the given string into the file. If you want to write a line, you must insert the \n newline character yourself; it is not automatic.
save.write("SAVE slot 1\n")
If you want the fancier options available from the print() built-in function, you can instead use print() as normal, but include a "file" keyword pointing to your file.
print("level", game.lv, "lives", game.lives, file=save)
Remember, you can only write to files that are in write mode. You also can only read from files that are in read mode. Attempting to write to or read from files in an incorrect mode will raise an exception.
Closing Files
Finally, when you're done with a file, you need to close it. If you leave it open, on most operating systems, no other applications can use that file! To close a file, use the .close() method.
save.close()
level.close()
Once a file is closed, you can discard the file object safely. Reading from or writing to a closed file does not work, and will raise an exception.
Useful String Operations
We glossed over strings in the past, but there are a ton of useful string functions you can use when reading from files. The most useful thing to do, for our purposes, is to grab parts of a line separated by white space. The easy way to do this is:
words = line.split()
The .split() string method returns a list of "words" in the string, separated by any number of whitespace characters.
Before doing that, you may want to check for indentation at the start of the line. You could make it so that indentation on a line indicates the data on that line continues what was on the previous line; this is very useful for encoding level grids. The easiest method uses the "string" module.
import string
There are a number of useful string built-in constants in this module. The one we're most interested in right now is string.whitespace, which contains all the white space characters accepted by Python. If we take the first item in a line and try to find it in the whitespace constant, we can tell if that line is indented right away.
>>> string.whitespace.find(" indented line\n"[0])
0
>>> string.whitespace.find("non indented line\n"[0])
-1
As you can see, using this trick with an indented line returns 0, but doing so with a non-indented line returns -1. -1 is the "did not find any instances in this search" option, while 0 is the index of the space character in string.whitespace. Thus, if this test returns 0, we know the line is indented.
Besides this, remember the .format() operation from Lesson 5 (in-depth documentation at https://docs.python.org/3/library/string.html#formatstrings) and the string method .zfill(). .zfill() takes a single integer as an argument, and will fill the left-hand side of the string with the "0" character until the string is at least as long as that number of characters. If fed a longer string, it will just return that string. This is useful for, for instance, outputting counts of seconds in a minutes-and-seconds display, or filling a score with zeroes to the left, or any other case where a number looks better with zeroes added.
>>> "4469".zfill(5)
'04469'
There are many other useful string functions and options available. For more information, see https://docs.python.org/3/library/string.html for some common string operations, and https://docs.python.org/3/library/stdtypes.html#string-methods for in-depth documentation of every string method.
Loading and Using Image Files
The pygame library has a fairly robust image loading system. Break It! uses this to form what's called a "sprite sheet," a single image that contains multiple sprites arranged in an atlas. The engine.py included also gives a nifty tool for splitting up sprite sheets, loading a single image and carving it up into separate pieces for the sprites, then giving them names. The explanation for how that works is further down, but for now, let's look at how it's loading the image in the first place!
To load an image file, simply use the pygame.image.load() function.
pygame.image.load(file)
This is the basic usage, and the only one we care about. You give this function a path to the file you want, in our case img/sprites.png, and it finds that file, determines what kind of image file it is, and loads the contents into a Surface buffer. pygame will happily use PNG, GIF, JPEG or raw bitmap images; I strongly suggest using PNG, so your colors stay crisp, and you still get to use transparency.
Now that you have a Surface in memory, you can easily blit from it onto another surface!
Blit?
Yes, blit! It's an old term, a shorter version of "BIT BLT" which meant "bit block transfer" in older machines. It copies a section of an image Surface onto another Surface. You do this using the destination Surface's blit() method.
surface.blit(self.sheet.image, offset, self.rect)
This is the typical usage, straight out of our Sprite object in engine.py. The object "surface" here is the target for the blit.
- The first argument is the source Surface you wish to copy from.
- The second argument is the "offset," a sequence (typically a tuple) of two parts, arranged like (x, y); it sets the upper left corner of the rectangle for the blit.
- Finally, the optional third argument gives the "area" of the source Surface you wish to clip out. If you omit this, the entire source surface is used instead.
- There is a fourth argument (also optional, and omitted here) that sets a bunch of mode flags for the style of "blending" for this blit operation. They're not useful for this example, but you might find them of use in the future.
For futher information on blitting in pygame, see http://www.pygame.org/docs/ref/surface.html#pygame.Surface.blit
Loading and Using Sound Files
Break It! does not use sound, but you will be adding sounds to it in your assignment. So, you need to know a little about how pygame's mixer works.
To load a sound into pygame, you create a new Sound.
sound = pygame.mixer.Sound(file)
As usual, file can simply be a path to a sound file. It can also be any number of ways of storing a sound buffer in raw data, or in a file like object, but we don't need to get into those in much detail here. Just give it a file path. OGG and WAV files are safe to load in this way; MP3 files might be a bit dicey on some systems, so be careful.
Once you have your new sound, you can play it using the play() function.
sound.play()
You can make it loop indefinitely by setting its "loop" parameter (also the first argument to the function) to -1.
sound.play(-1)
Any other value for "loop" will be interpreted as a number of times to loop after playing it once, before stopping. So giving it a value of 5 will play the sound a total of 6 times before it stops.
You can stop a sound at any time using the stop() method.
sound.stop()
You may also find it useful to turn the sound down. By default, a sound will play at maximum volume (1.0); you can set the volume of a sound to anything between 1.0 and 0.0 using the set_volume() method.
sound.set_volume(0.1)
You can also get the current volume at any time using get_volume(), in case you want to check what it was last set to for any reason.
vol = sound.get_volume()
One final note on the Sound object: the number of channels in pygame's mixer is limited, so if you're playing too many sounds at once, an earlier sound may abruptly stop playing to make room for another sound.
As for the mixer itself, the most useful functions available to it are the pause() and unpause() functions.
pygame.mixer.pause() # pauses all sounds on all channels
pygame.mixer.unpause() # starts playback right up where we left off
A note before we continue: if you're going to have a lot of objects using the same sound (or the same image, for that matter), it's a good idea to only open one copy of the file for use with those sounds. A good place to load sounds like this is in the Game object, or if it's unique to one class of objects, you could load it in the class definition itself. Just do not, say, load a sound file in the __init__ method for every Brick in the game, or you might be shocked at how much memory it takes up!
Finally, there is the "music" module. This is useful for setting up background music, and will not attempt to load the entire file at once. Instead, it will stream the file as it plays, keeping the file open on disk. The music module may only open one file at a time, and only has one channel dedicated to music playback.
To open your music file, use the load() function.
pygame.mixer.music.load(file)
This should be an OGG file. MP3 files may be a bit dicey still, but you can try it if you must.
To play the music, run the play() function as below.
pygame.mixer.music.play()
This plays the music once. If you have music that is perfectly loop-ready, you can set it to loop indefinitely using this:
pygame.mixer.music.play(-1)
This should look fairly familiar, given what we just went through with the Sound object.
There is also a stop() function, used the same way, and pause() and unpause() functions, which work similarly to the Sound stop method and the pygame.mixer pause and unpause. There are even volume getters and setters, which are named and work the same as for the Sound methods.
Finally, there is rewind(), which lets you return to the start of the current music file.
pygame.mixer.music.rewind()
For more information on the pygame mixer and music sub-system, see http://www.pygame.org/docs/ref/mixer.html and http://www.pygame.org/docs/ref/music.html
Collision Testing
One last thing before we dive into the meat of the game: we didn't quite cover how pygame's collision detection system works!
There are a few pygame.Rect methods that are of use for collision testing.
.collidepoint()
This takes either a pair of co-ordinates, or a co-ordinate pair in a tuple (x, y), and tests if that point is inside of the Rect. Returns True if a collision is found, False otherwise.
.colliderect()
Takes a Rect as its argument, and returns True if the rectangles intersect, False otherwise. This method does not count the edges of a rectangle merely touching as a collision, because otherwise many false positives would result.
.collidelist()
Takes a list of rects, and tests for collision. Returns the index of the first item in that list that has a collision with this Rect. Returns -1 if no collision is found.
.collidedict()
Takes a dictionary containing rects for all of its values. Returns a tuple (key, value) pair for the first item in that dictionary that collides with this Rect. Returns None if there is no collision found.
.collidelistall() and .collidedictall()
These take the same arguments as their counterparts without "all" at the end, above, but instead of returning only the first item with collision, they will continue to iterate through the entire list or dictionary, and return a list of all the resulting indices or (key, value) pairs, respectively.
There are also methods in the pygame.sprite module for testing collisions. Some of these test using rects, some test using circles instead, and some test using a "mask" consisting of parts of the sprite that are part of the collider. These methods are beyond the scope of this lesson, but you can look at them in more detail if you wish. That part of the documentation is at http://www.pygame.org/docs/ref/sprite.html.
One last note
You might notice, if you're on certain systems, that the Break It! example game runs a bit slow. If this happens on a Mac with a Retina screen, that's the culprit; my Macbook Pro couldn't get over about 30 FPS if I tried to run pygame on my own laptop monitor. This is simply a quirk of pygame and Macs, and there's no way to code around it, but you can still trick it into playing nice.
If you have an external screen you can hook up, say, with an HDMI cable, you will find pygame apps run much faster as long as you run the program in that display only. Dragging your Terminal app window into the external monitor, cd-ing into the directory and running the program seems to be the best way to do this.
With that said, on to the example code!
Break It! Documentation
What follows from here is the documentation for the "Break It!" example game produced for this course. This will go into every component of the game, including functions and object classes. But first, a little history.
Why Arkanoid?
Arkanoid is a classic game that has been remade countless times due to its simplicity and modularity.
Before Arkanoid, there was Breakout. Released by Atari, Inc. in 1976, Breakout was a simple arcade game with a paddle and ball (similar to Pong) but for only one player. Rather than playing simply like a game of squash, Breakout had bricks on the top of the screen that could be destroyed when hit by the ball. The ball would bounce off of bricks it hit.
When all bricks in a level were destroyed, you would continue to the next level; but there were only two levels in the original game. If the ball fell past your paddle, you would lose that ball, and serve a new one. Once all three balls had been lost, the game was over.
Breakout was simple, but not terribly exciting. The "Super Breakout" sequel added some additional game modes for variety.
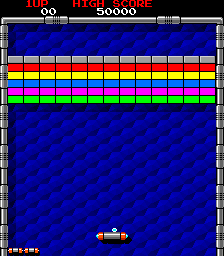
[Screenshot of Arkanoid, Taito, 1986]
Arkanoid was an improvement over the Atari series, created by Taito in 1986. Arkanoid made the game more exciting by adding power-ups! These were capsules with letters on them, corresponding to one of the following:
- (S)lowing down the ball's speed,
- (C)atching the ball when your paddle contacted it so you could shoot it out again when you wanted,
- (E)xpanding your paddle horizontally,
- (D)isrupting the ball to split it into three ("Multiball" basically),
- (L)aser power-up that gave you an energy weapon to destroy bricks directly,
- (B)reak, which skipped directly to the next level, and
- (P)layer, which gave an additional try.
If all balls on the field fell behind the paddle, that paddle would be destroyed. If you had any additional paddles left, you could try again, and continue the level. When all were gone, the game was over.
The ball gets faster and faster the longer it's out in the play field. The (S)low power-up would buy some extra time for the player before this became uncontrollable; otherwise, this was the main way that the player might lose a paddle.
Another addition this game made was to add new kinds of brick. Some took extra hits (they would glimmer or crack when hit but would take at least one more bounce to destroy). Some hid power-ups, which is where the power-up capsules came from. Some were indestructible; these were not counted when checking if the board was clear, so the player could still finish the level.
Arkanoid also added enemies that would float around the field, and had to be contacted with the ball, a laser shot, or with the paddle to destroy them. These didn't do anything against the player otherwise; they just gave points for the player's score. The version of "Break It!" included here does not have enemies, but you may add them if you want, during your assignment.
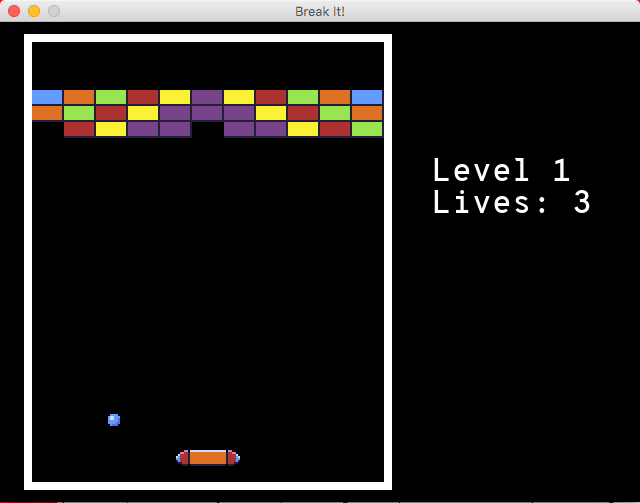
Break It!
Our game's name is Break It! This is in part because of the Breakout games, but also because I fully expect that while testing your improvements in code, you will in fact Break It at least a few times. I know I did while making it.
The program is here: L12-game.zip
The included README.txt explains how to play, but briefly: you need to clear each level by breaking all of the bricks. The ball bounces off the walls and will break any brick it touches, causing them to disappear as it bounces off. When you bounce the ball off your paddle, where it hits on the paddle determines how steep of an angle it will bounce back into the air. The regions that produce different angles are roughly color-coded.
There are also power-ups hidden in some of the bricks. When you break a brick with a hidden power-up, it will slowly drift down the playing field towards your paddle. If you touch it with the paddle, you gain the benefits of that power-up. Only the (P) bubble, which gives an extra life, has been implemented so far, but you will be adding at least one more on your own.
The ball does not speed up in this game, as that complicates things considerably. Even given its simplicity, I had fun making it.
Global Variables
There are none to speak of, really, and this is by design. Everything is passed to the main objects, and the main() function initiates everything and sets up the main loop.
Object Classes
This is where the real meat of the game is. Nearly everything is contained in objects, from the engine's various components to the ones behind the sprites you see on screen during play, like the paddle and ball.
MainMenu
The screen we start at. Displays the name of the game, the authorship (by Aubrey Smith), and two buttons, one to Play the game, and the other to Quit and close the window.
PlayScreen
This is the Screen mode that displays the play space, as well as the heads-up information on the right hand side (the current Level and the number of Lives remaining.) When the game is over (or if you want to leave play early, when the player presses the Escape key) this will relinquish control back to the MainMenu.
Paddle
The Paddle responds to user input, moving left and right according to keyboard presses, and launching the ball according to different presses. The paddle accelerates a little at the start of its motion, starting slow, then speeding up to double that within about a tenth of a second.
Most of the rest of what the Paddle does is interact with the Ball and Pickups, and get removed from play when the Ball falls below it, destroying it.
Ball
The most complicated object in the game. The Ball bounces off walls, bounces at an angle off the paddle when it strikes it, will launch off the paddle at an angle determined by the paddle's velocity at the time, and tests for collisions with every brick on the field, every frame, bouncing off any it hits.
If the ball falls past the paddle and hits the bottom of the play field, it's destroyed. If there are still bricks on the field and there are no balls remaining, the paddle is destroyed and the life counter ticks down by one!
Timer
This is a Timer object with associated UIText to place on the field. This was used in an earlier build of Break It! that had no bricks, and required you to keep the ball up in the air for 30 seconds, bouncing off walls, without letting it fall past the paddle.
You could also use the Timer to track how long a timed power-up lasts, if you wished.
Brick
Represents a breakable brick! Bricks have HP, but they don't matter much in this build, since there's only ever 1 HP to a brick. Bricks have a position in the grid, determined by the level data. They don't move. When they break, if they have a pick-up hidden inside, it will spawn in the field and slowly drift down. The level is won when all bricks are broken, and the ball will then disappear; however any remaining pickups will continue to drift down.
Pickup
A generic class for pickups, the power-up bubbles that drift down from above. There are six of these in the sprites.png sprite sheet I included, but only one is used for the game (the purple (P) power-up for giving an extra life). Pickups by default will drift down 1 pixel per frame, half the speed the ball moves vertically. A level cannot end until all pickups are either caught, or fall past the paddle (which causes them to disappear).
Additional pick-ups should be extended from this Pickup class.
PupExtraLife
Stands for Pick-Up: Extra Life. Represents the purple (P) pick-up. When it collides with the paddle, it adds 1 to the life counter.
Level
This is what holds the level information! Each level holds the data for its contents as a long string (which it reads as an image made of characters, 11 characters wide per row). It also holds data for where to put its power-ups in that space, given in x,y co-ordinate pairs after the single letter identifying the type of power-up. (The top-left-most slot a brick could fill in the board is 0, 0 for this purpose.) The load() method is what determines the meaning of all of this, and is where you would need to make edits to add a new valid letter for a power-up, for instance.
When it's time to load a Level, it loads all of that data into objects stored in the Level, and makes sure a Paddle and Ball are ready in the middle of their track at the bottom of the screen. The Level will check every time a brick or pick-up is destroyed to see if the level has been won, and if it's time to end the level and move on to the next one.
Game
This is where all of the game objects live during play! This keeps track of the time to wait between levels (and lost lives) as well as the life count, and nearly any other vital information in the game. It collects all of the game objects not otherwise handled by the Level object. It's also where the game loads its SpriteSheet and inputs its level data. You'll want to inspect that level data, because you're going to need to add a new level to the game. Playing the game a couple times, and observing where the bricks appear, and which contain pickups, will help you read this data more easily.
State
A fairly simple object, this keeps track of which Screen we're currently on (the MainMenu or PlayScreen) and whether we need to update the window surface with a new frame. It also starts up the clock we use to make sure we're not outrunning 60 frames per second.
Engine Objects
The engine hides a bunch of objects that are complex enough to be confusing. Since you'll be mimicking code in the above objects to finish your assignment, knowing what some of these objects do might help you.
UIElement
This is a base class for other user interface elements. Sometimes it's used by itself, when a single-use object needed to be hacked together. It does a bunch of formatting, takes some color information into account, allows for dynamic resizes and repositioning that remembers if it's supposed to be centered in one or both dimensions, and a few other nice perks. It can also draw a border around itself that looks better than what pygame will let you do with a simple pygame.draw.rect() call.
UIText
Adds a bunch of helpful options for handling text better. Wants pygame.freetype.Font objects for fonts, because these give much better and more efficient options than pygame.font module's objects do. You'll be copying some text related to this at least once, to add a credit line for yourself under mine.
UIButton
Extends the UIText further, allowing it to take a click and do something with the result. Used by MainMenu.
SpriteSheet
An object for loading an image using pygame.image, then using the given stream of rectangle and name data, it cuts that image up into a set of sprites, saves the rectangles for those sprites, and names them for call-back using its "sprites" attribute, a dictionary using those names. The Game object uses this to load all the sprites in the game, using only one file.
Once the sprites have been named, calling one up is as simple as going to the game object's spritesheet attribute, and pulling up its "sprites" attribute. Then you go sprites["some-sprite"] for whatever name of sprite you have in place of some-sprite, and that will access the appropriate Sprite object.
Sprite
A single sprite connected to a SpriteSheet. Has an easy-to-use render() method that simplifies the blitting process, assuming you don't want to do any fancy blend modes. (Most of the time, you won't.)
You might wonder why we even need this, since pygame already has a Sprite object. Put simply, pygame's Sprite object loads its own Surface, so every Sprite would wind up with its own separate image buffer in memory. This is unwieldy at best. With this engine's Sprite system, we only need one image buffer in memory, and can make use of pygame's built-in blitting engine much better than the built-in version.
Functions
main()
This is where the game starts, and where it loops until it ends. As long as the game's engine State doesn't exit out, by setting its "screen" to None, this will loop forever, once every 1/60th of a second at most.
Engine Functions
The only engine function is whencollide(), which is a component of the physics engine we won't be covering in detail here. Suffice to say it's useful for figuring out what side of a brick or paddle the ball hit, or if it bounced off a corner, and that it's necessary for calculating the ball's bounces accurately. The paddle cheats a bit and always bounces the ball upwards, to be kinder to the player.
This should give you everything you need to know to complete the assignment. Take a look through the provided source code, and make the improvements suggested.
Exercise: Improve "Break It!"
Take the "Break It!" game as it exists in Lesson 12 (L12-game.zip), read through the code as you need to, and make the following improvements to it. This may take quite a few hours to complete, so space out your work day to day as needed.
Add at least one new level of your own design. The level should load when the existing levels are over. If you add more than one level, they should load in sequence.
Add at least one kind of "power-up" pick-up to the game, which when broken out of its brick, will descend so you can collect it with your paddle. (Hint: extend the existing Pickup class, like PupExtraLife does.) This power-up should probably do something similar to an Arkanoid power-up. Any new power-ups should be removed from the paddle if the player loses a life. (Look at what happens to the Paddle when a life is lost, for a hint on how to do this.)
Make sure to add your own name to the title screen, below the original author's name. Your own credit line should read something like "and Your Name". You can use the original credit UIText as a guide, making sure you place your new one far enough below that both appear without crashing into each other. Remember to keep both credit lines!
(Optional) If you like, add some sounds to the game. Good times for sounds to appear are when the ball bounces off walls or the paddle, when a brick is destroyed, when the player catches a pick-up, when a level starts, and when the player loses a paddle. Look ahead at Lesson 13, in the section on Where to Get Resources, for a tool to help with making these sounds.
A note on power-ups: first, make sure you clearly explain, in game or in your version of the README.txt file, what each power up you add does and what its falling item looks like (yes, even if you only add the single one you're required to). Remember to look at the sprite sheet, and how the existing code carves it up; there are a bunch of extra sprites available that aren't being used for anything yet.
Feel free to also look up Arkanoid games, or other clones of Arkanoid that exist out there (like, say, Wizorb), for inspiration. Given how many clones of Arkanoid there are, you'll have a lot to choose from.