This lesson is to prepare you for an individual, one-week-long game jam. You will be producing your own game, using what you've learned about pygame. Feel free to read back to any of the lessons you've done in this course so far, or check any documentation you need to reference.
Game Type Options
Since this will be the first game you make yourself, it's best if you base it off of an existing style of game. There are a few that could act as good options for you to start with, so I've listed three of them here.
Every game has rules, and we'll cover those rules for each of these options, and how you can expand on them further. Feel free to add your own ideas in as well, once you have something basic working already.
Your game should at minimum have a reachable condition for a player winning the game, and one for the player losing the game. You must explain what the rules of the game are, preferably both in the game itself and in a README.txt file you include with your game files. The game must also actually follow the rules you give in the readme file, and any rules you explain in game, so make sure it's correct.
Remember, you only need to make one game for this assignment, so pick whichever one of these options you like best, and stick to it.
Option 1: Quickdraw/Samurai
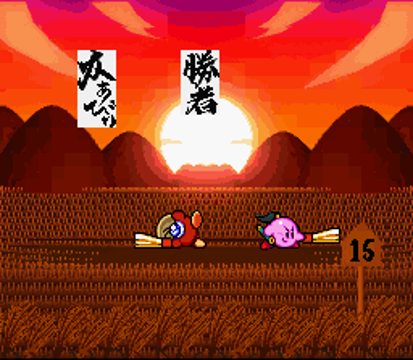
[Samurai Kirby, from Kirby Super Star for the SNES. This game is a re-skin of the Quickdraw mini-game from an earlier Kirby title.]
The concept: you have multiple rounds, and two characters. Either two players play against each other, or one player is against a computer opponent.
There will be a cue (preferably both visual and with a sound) that tells the players to "go." If either player pushes their button before this cue, they lose due to a "foul."
After the cue goes off, the player who presses their button first wins the round.
For the two player game, make the game take five rounds; best 3 out of 5 wins. On a draw, redo the round.
For one player vs. the computer, the AI should "press a button" after a set number of frames per round, shorter the further you go. Note that human reaction time is about 1/10th of a second, or 6 frames, and making an enemy move at or faster than maximum human reaction time may not be fair.
You should implement at least one of these two modes; feel free to add a second mode if you want, once the first mode is complete.
If you wish to make the gameplay even deeper, you can add multiple button prompts instead of just one. So, for instance, you might require the player to face off against two or three AIs, and the A, S, and D keys each are keyed to one of them. They must press the button that flashes on screen soon after it appears, or the AI wins. (Again, only implement this after you've already finished a working quick-draw game, so you know you're already done.)
Option 2: Memory Game
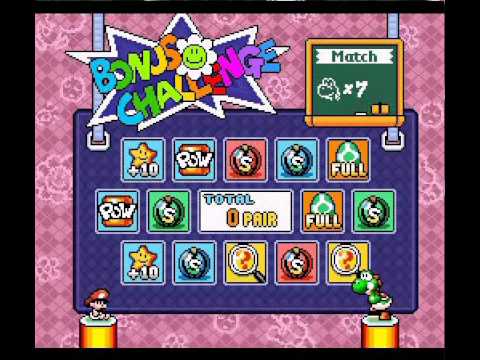
[Memory game "Bonus Challenge" from Yoshi's Island for the SNES]
This game involves a set of cards with symbols or images on them. Every image appears on exactly two cards in the set. You should make those images as different from each other as you can, so they do not confuse the player further. (The above example is a bit unfair due to the three different colored power-up watermelons.)
The player will be shown the entire set of cards for a brief period of time (say, ten seconds) and then the cards will flip over. The player may then click on cards, one pair at a time; the first click reveals the first card, and when the second click happens, reveal the second card, and indicate to the player (preferably both visually and in sound) whether they got that pair right or wrong.
Continue this pattern until either all cards are revealed, or the player has failed to reveal a pair a certain minimum number of times. If you allow the player to fail more than once, you should turn both cards over after a brief moment; do not accept user input to flip over more cards until the failed pair flips over, and indicate to the user how many times they've failed, and how many chances they still have left (for instance, with boxes in the corner that have Xes crossed over them when the player fails once).
If you wish to extend this, offer different modes, possibly with adjustable numbers of chances before the player loses, or with a different number of cards.
Option 3: Maze Game
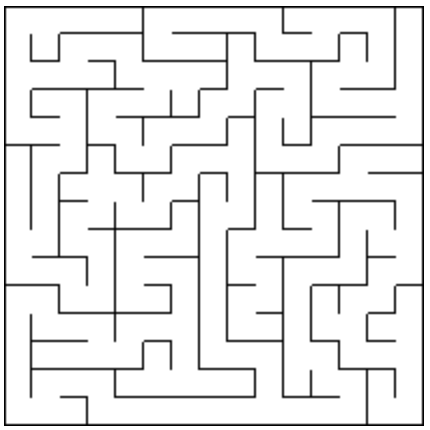
[An example maze made with the recursive backtracking algorithm, demonstrated on James Buck's website]
This is a turn-based game with either a static maze you provide to the game, or a randomly generated maze. The objective of this game is to get from your starting point in a maze to the exit. The entrance and exit may be arbitrary points in the maze, but one should most likely be on one edge of the maze.
The player may be required to exit the maze in a minimum number of moves, or to exit before a time limit is reached.
If you wish to generate new mazes when the game level opens, you can use a maze generating algorithm. The easiest one to implement is probably the "recursive backtracking" algorithm, described in this post by James Buck. He includes more complex algorithms as well, which are linked from his recap post on all the algorithms he covered.
Once you have a working maze game, you may expand this by doing one or more of the following:
- Hide parts of the maze from the player if they have neither visited those areas, nor can currently see them.
- Add "treasure" items to the maze that are worth some kind of points (you can use $ amounts or similar, if you want). The objective will thus be to gain a high score.
- Add enemies to the maze that can damage the player's character. This will require that you give the PC some amount of hit points, so they can take more than one hit before losing the game. The objective should now be to get from one end of the maze to the other quickly while surviving. The easiest way to manage this is to make the enemies move in a regular pattern, e.g. once every three player moves, in a random direction that is telegraphed by the enemy (through a visual cue that stays on screen) one turn before they move.
- Add multiple levels to the maze. Perhaps later levels use a different maze algorithm, are larger, or have more interesting shapes.
Another Option: Your Own Idea
You can also look for inspiration with other games you've played, and try making a very simple version of that as a starting point for your first game. Make sure what you try to make is something you can implement in 2D, using what you know about pygame. And remember, you don't need to make a game as good as your inspiration; you just need to make something that works, can be won or lost, and follows the rules you tell us it has.
Development Process Tips
Working on Your Own
You're going to be working by yourself on this project, though you can certainly talk shop with other students. For instance, you might want to share what you've learned about the pygame library or other general game development stuff. Game developers often talk about these things together, though they don't often talk about specifics of their ongoing projects, so don't give away your game's entire source code to others, or anything like that.
If you're having trouble in the first day or two, try setting aside a little bit of time each day to work on the game. If you're having trouble picking an option at first, sit down and think about which one you'd want most, and if you can't decide, roll a die, flip a coin, put the options on pieces of paper and pull them at random out of the hat, anything you like really. Just make a decision early and stick to it.
Remember, you only need to make a basic game, but you should keep building on it afterward. Try making something that works first, as early as possible. Then make a backup. You want to have something you can send in for the assignment, regardless of what might happen, or how far you get on your current additions to the project. Don't worry if you didn't get that neat extra feature done, just turn in what works, and meets the requirements of the assignment. Thus, the backups of your finished, but "incomplete" game jams.
The process of working on a basic version of something that does the minimum of what you need, then building on it, is the basis of what's sometimes called the "Agile" development method. There are many versions of Agile, and they vary greatly, but it works well both alone, and in a team. We'll cover the Agile method in more detail in the next lesson.
Where to Get Resources
First, try to stick to either making things yourself, or using free options online or available tools. What follows is a list of some useful tools, two free ones and one relatively inexpensive one.
SFXR is a classic sound-effect-generation tool used for game jams since 2007, with multiple versions that have come out since. Since the game jam Ludum Dare takes place over a mere two (or three) days of work, this tool comes in handy. There is a pure Javascript version of it, jsfxr, available on Github. (Note: this will make noise when you open the page!)
Piskel is an online pixel-editing application, again available in a Javascript form; but this one just requires pressing the "Create Sprite" button in the upper right corner of the website. Piskel's website can be found here; you do not need to sign in to use it.
GraphicsGale is a well-renowned Windows-only sprite making program, recently made freeware. You can get it from the GraphicsGale website free of charge. There are no versions for Mac or Unix-like OSes, however.
For the not-so-free route, there is also Aseprite, which is an incredibly good pixel editor. It has options for testing animations, as well, showing you what things will look like when in sequence. Aseprite currently costs $15 in USD, and the Aseprite website can be found here.
There are a number of free online resources available for you, if you choose to use them. Sean Massa has made a list of these on Github, and while some are 3D resources or others outside the scope of our projects, you may find the sprites and other 2D assets, and the sound effects and music resources, of some use in this project and the month-long group project.
Credit Where Credit Is Due
This is so important it needs it's own headline.
Give credit for every sprite, every sound or music file, every code snippet that is not yours.
If you didn't make it yourself and it's in your project, tell us where it came from. At minimum, put the credits in your README.txt file. If you want, you can additionally put the credits in your game, maybe as a scrolling section or multiple static pages. A "Credits" option on your main menu screen could be a good option for where to put this.
Worth noting, if for some reason you like the engine.py code I made for the previous lesson's material, go ahead and use it! But on one condition: you must give me credit for that part of your code, and also state that you used some engine code from me in the same place as your other credits (the README.txt and optional Credits screen). Credit the relevant snippets to "Aubrey Smith, Lotus Fox LLC", and you're good. You can even take just parts of the code, such as the SpriteSheet system and use it for your own purposes, as long as you give credit for it.
The above rule of giving credit is how this should go for all of the various kinds of resources you include in your project.
And that's it for this lesson! Go ahead and get started on your game. Good luck, and have fun!
Exercise: Individual Game Jam
This is a one-week game jam. Take one of the options in the lesson above, and build a game based on it; or, find inspiration from somewhere else, and make a game on your own terms. Either way:
The game must have a win condition and a loss condition, and both must be reachable by the player(s), and
The game must have established rules, which you need to outline in a README.txt file in the .zip file you send in. In addition, you may explain the rules inside your game; any tips you give on the rules in game must be true. Don't lie to players about the rules.
As stated above, all resources, outside code, and any other parts of the game that aren't your own work must be credited to their creators, by name. This includes engine.py, if you choose to use it. Make sure not to use copyrighted works without getting permission from the creator first!
Your final result should be packaged in a .zip file, with all required files for someone with pygame and Python 3 already installed. Thus, all sprites, sounds, fonts, and other resources must be included in your .zip file. You can include some of them in sub-directories if it suits you; recall the explanation of file access from Lesson 12. You'll know you're successful if the end result works on someone else's computer! (Though again, they need pygame and Python 3 installed.)